 Murmur
Positional ambient audio for your Owlbear Rodeo Scenes; sounds that belong in the world, not bolted on top.
Murmur is an Owlbear Rodeo extension that lets the GM place invisible audio emitters on the map. Each emitter plays ambient sound - a crackling campfire, dripping cave water, a bustling market - and the volume fades naturally as a player's token moves closer or further away. Environmental digital signal processing (DSP) presets make the same campfire sound completely different in a cave versus a forest clearing.
Why Murmur?
Most VTT audio tools work like a DJ booth - you press play on a global soundtrack and everyone hears the same thing at the same volume regardless of where their character is located. Murmur works like being there:
A player standing next to a waterfall hears it roar. A player across the map hears a distant rumble, or nothing at all. The same torch crackle sounds intimate in a stone hall, muffled in a forest, and reverberant in a cave. Multiple emitters co-exist independently; a forge hammering in one corner, crowd chatter in another, rain on the roof overhead. In Player mode, each person hears the world from their character's position, not the GM's; no two players hear the same mix. In Party mode, worldmap navigation is simplified, because all the players hear the same things as their characters travel together
The result is ambient audio that reinforces spatial awareness and makes scenes feel alive, without any manual mixing from the GM.
Getting Started
1. Install the Extension
Copy the Murmur manifest URL:
https://murmur.several-record.com/manifest.json
Then head to your Owlbear Rodeo Room's Extras menu -> Extensions -> + (Add Custom Extension), paste the URL, and confirm:
2. Enable Murmur in Your Room
In the Extensions popover, make sure Murmur is toggled on for this Room:
You should see the ![]() Murmur icon appear in the top-left extension Action tray.
Murmur icon appear in the top-left extension Action tray.
3. Start Audio
The first time you open Murmur in a session, you may see a Start Audio button. Click it once - browsers require a user interaction before they allow audio playback. This is a one-time action per page load:
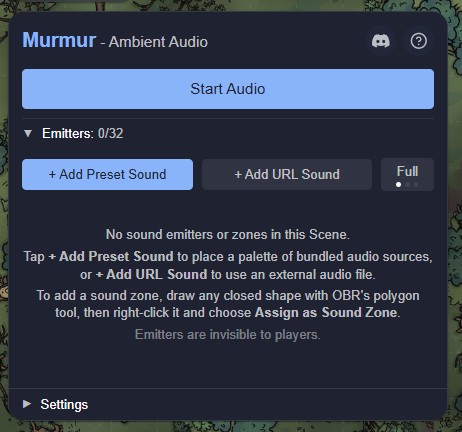
No microphone access is needed. Murmur only plays audio; it never records audio.
Adding Listeners
When you first click the Start Audio button, you might not have any tokens in the Scene yet, hence no listeners through which to hear any sound effects that you place. So, to enable you to listen to your ambient audio while you build that soundscape, there is one quick but temporary option and two slower but lasting options:
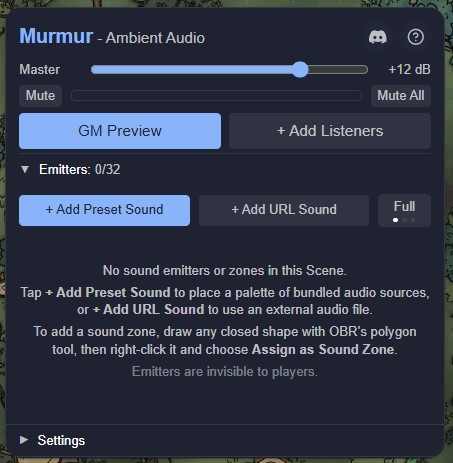
Method 1: GM Preview (quick but temporary)
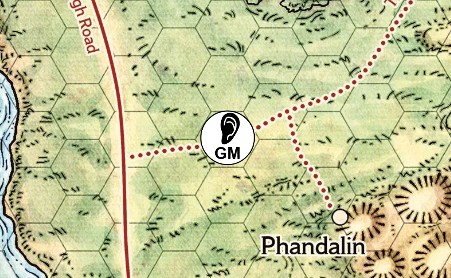
Click the GM Preview button in the popover to spawn a dedicated GM preview token quickly, located in the middle of your viewport:
You can then move it around the Scene to sample the soundscape in different spatial positions during your session preparation, even before you're ready to add Character tokens that will become the listeners for your party:
From here you can immediately start adding emitters (see below), but note that your players can't use this GM-only preview token as their own listener, instead they need to listen through a real Character-layer token that you have defined, which is where one of the other two methods (+ Add Listeners or Set as Listener) becomes necessary.
⚠️As soon as you have added a Character-layer listener, the GM Preview mode is cancelled and you switch to listening through one of the defined listener tokens.
In the popover, you can see a small avatar of the preview token, along with an instruction to 'drag GM preview marker on map' to change your listening position, plus an option to Remove the preview token (which you can also do by selecting it in the Scene and deleting it):

*How many listeners do I need?*
If the party has split up and each player is acting independently, they will each need their own listener token that provides their own unique soundscape. Alternatively, if the players are moving through the Scene as a cohesive party then they only need one listener that they all share, giving them the same ambient audio soundscape. Regardless of which mode is in use, at least one listener token needs to be defined in the Scene! The Character-layer tokens that the players already use are perfect candidates for becoming the individual listeners, and likewise if you have a single 'party' token for overland travel then that is ideal for a shared listener.
Method 2a: + Add Listeners (slower but lasting)
The + Add Listeners button will produce a popover with instructions inside it - while this is open you can select any Character-layer tokens in the Scene to add (or remove) them from this pool of listener candidates, and then Cancel or Confirm your changes with the buttons at the foot of the popover:
⚠️As soon as you have added at least one Character-layer token as a listener, you are ready to share that listener's audio with your players in-game. The GM's popover also shows an Edit button on the right-hand side of the listener avatars:
When that Edit button is selected, the Define Listeners popover re-appears, showing all current listeners:
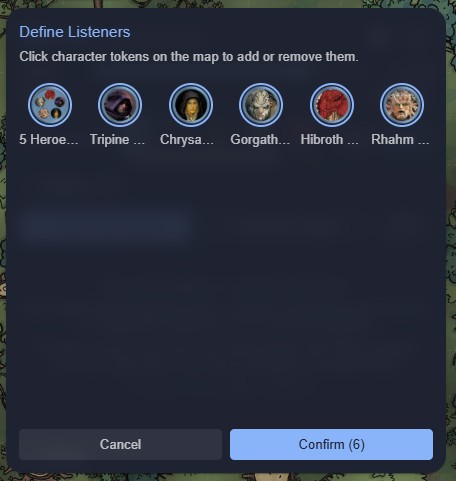
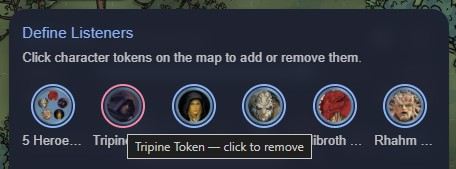
Within this popover, clicking on any Character-layer tokens within the Scene will toggle them into/out of this list, and you can also cancel an existing listener definition by clicking on any token in this pool to remove it - if you hover over a token you'll see it gets a red halo and a tooltip confirming what will happen if it is selected:
Method 2b: Set as Listener (slower but lasting)
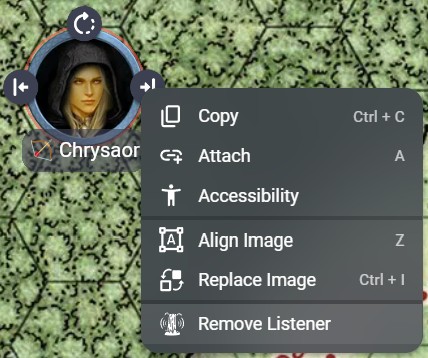
Every Character-layer token has an option in its overflow menu to Set as Listener (or Remove Listener if already added):
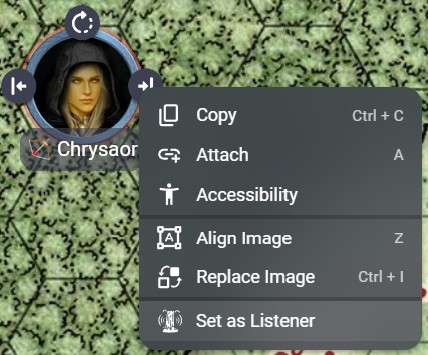
This method also works with multi-selected Character tokens in the Scene, which can all be Set as Listener (or have Remove Listener applied) together.
As soon as any such changes are made, the GM and every player will see new listeners appear in their list, and any removed listeners will disappear.
Live Listener Updates
If a removed listener was the active source of ambient audio for anyone, that person will default back to hearing the first listener in their list (if any), which is confirmed by the blue halo moving onto that avatar:

GM-only Listeners
If the GM needs to have their own private listener for previewing sounds away from what the players can hear, then hiding the listener token in the Scene will remove it from the players' avatar list but leave it available for the GM to select. Within the GM's avatar list, hidden listeners are separated from player-accessible listeners with a vertical line:

⚠️The player-accessible (visible) listeners are to the left of the divider, and the GM-only (hidden) listeners are to the right of the line and have a subtle background tint.
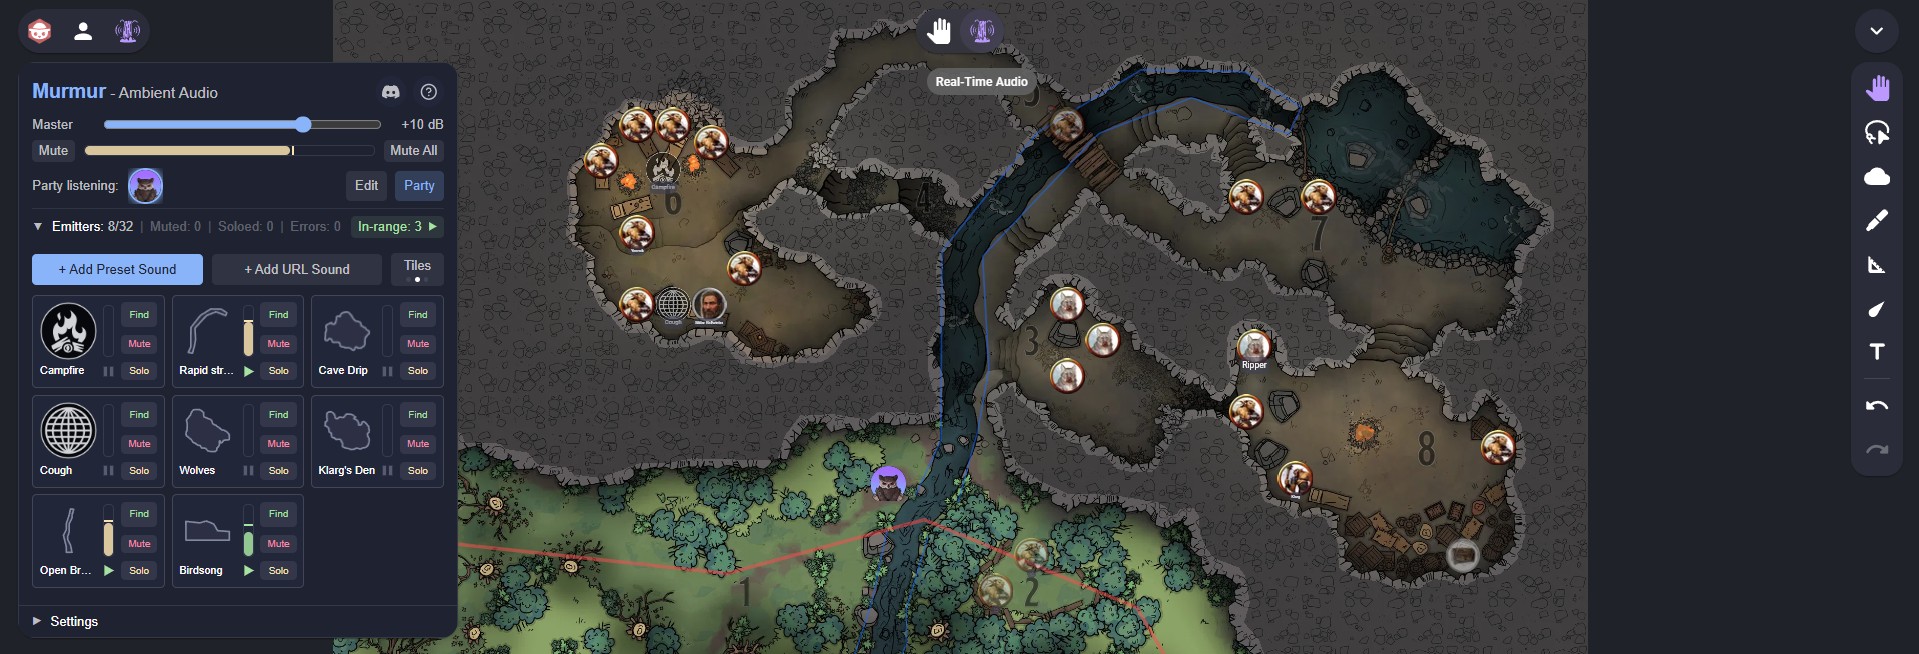
Real-Time Audio Mode
By default, audio position only updates after a dragged token is released. Murmur's Real-Time Audio mode makes volume change continuously while you drag - so walking a character token closer to a campfire sounds like you are gradually approaching it, not jumping to the new position instantly.
Activating Real-Time Audio
Real-Time Audio is a new tool mode added to the Move toolset. To enable it, select the Move toolset from the right-hand toolbar and then click the Murmur icon in the mode bar in the centre of the top edge of your screen:
⚠️The Murmur icon
What it does
While Real-Time Audio is active:
- Dragging any token replicates movement with the native OBR Move mode
- A listener token's audio mix changes continuously during the drag; everyone in the Room who's using that listener token hears those changes as they happen
- Rings, labels, markers, and other attachment children follow the drag as their parent token is moved
- On release, the token snaps to the grid as normal (according to the snapping sensitivity set by the player dragging the token)
*Known limitation*
⚠️Activating any custom mode on OBR's Move tool suppresses the tool's built-in empty-space drag (viewport panning). While Real-Time Audio is active, you can still pan the viewport with the mousewheel button, two-finger (touch) gesture, or the spacebar keyboard shortcut, but you cannot click-drag empty space to pan. Switch back to OBR's default Move mode if you need to pan with click-drag.
It may be possible to overcome these tool-mode limitations in future - watch this space!
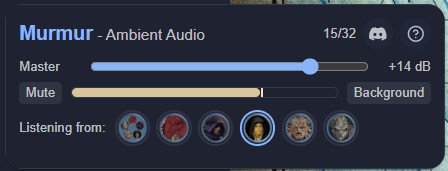
Player Mode
This is the default mode for Murmur, indicated by the GM's Player button near the listener avatars and Edit button:

While this mode is active, the GM and each of the players can each choose their own token that represents their character (or a companion, NPC, etc), and all players hear the Scene from their own token's unique perspective. Each player's popover will show Listening from: and their token is also highlighted with a light-blue ring amidst the available options:
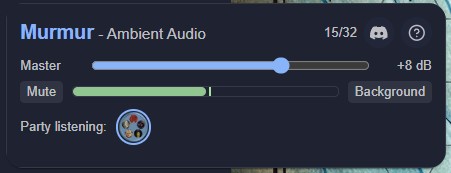
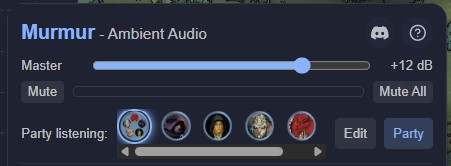
Party Mode
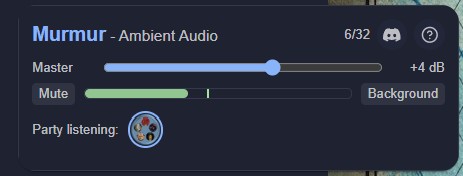
This is the opt-in mode for Murmur, indicated by the GM's Party button near the listener avatars and Edit button:

While this mode is active, the GM chooses a single token that represents the whole party, and all players hear the Scene from that token's perspective. Each player's popover will show Party listening: and then that party token highlighted with a light-blue ring:
If other player-accessible listeners are in the Scene, they will be greyed out in the player's popover and can't be enabled there:
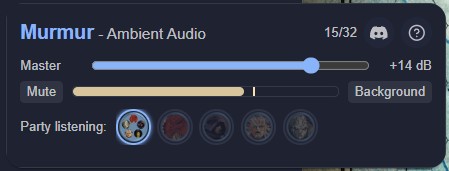
The GM can choose between any of these player-accessible listeners, effectively choosing the listening position for everyone just by clicking on one of them (and the blue 'Party' halo will confirm which is currently selected):
*Special Party Mode Scenario*
In Party Mode, if the GM has set up any hidden listeners for private previewing of the Scene's soundscapes, these will work like a 'Solo' function for the GM only. They will still be shown in the GM's avatar list on the right-hand side of the vertical separator, but now the GM can select one avatar from the visible (left-hand) listeners for all the players, while still being able to select any of the hidden (right-hand) listeners for themself alone:

As you can see above, when the GM solo's one of their own hidden listeners, that avatar gets a yellow halo indicating that the GM is the only person hearing that mix, and the blue halo remains on the Party listener that the players continue to hear.
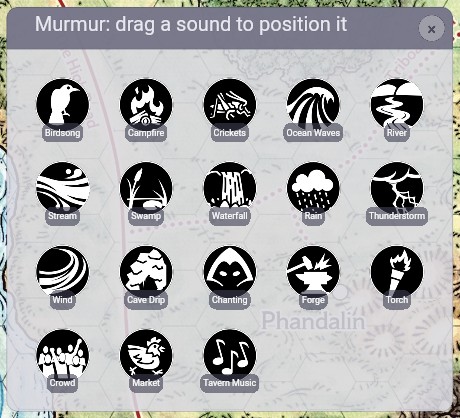
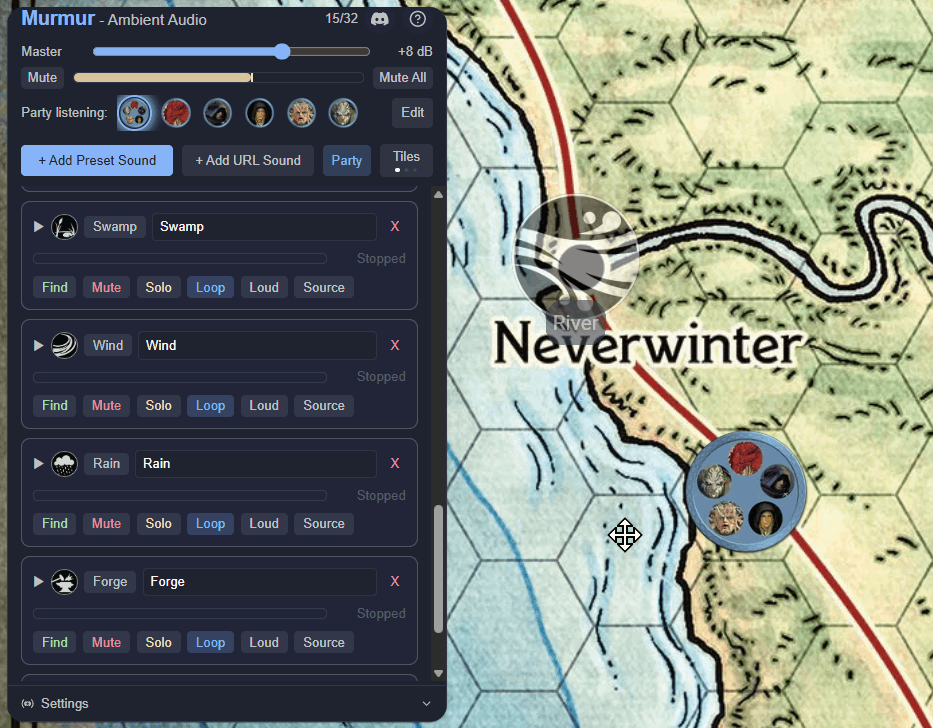
Adding Preset Emitters
💡Emitters are invisible map markers that define where a sound comes from and how far it reaches
The Presets Palette
Open the Murmur popover and click the +Add Preset Sound button:

A palette of icons appears on the canvas - one for each bundled preset:
💡The palette can be click-dragged around if it obscures part of the map where you want to add an emitter.
Drag any icon from the palette onto the map to place it. The emitter immediately begins playing for anyone whose token is within range. The palette will be automatically dismissed 20 seconds after the last interaction with it, or immediately if you click its dismiss 'x' icon or its timed Dismiss Palette button in the Action popover:

Placed emitters can be duplicated freely - the easiest way is to hold Alt and click-drag a copy out of the original, or use the original token's Duplicate icon:
💡Emitters are added to the Scene as hidden tokens, so that players cannot see them - they only hear the emitters' audio.
Emitter Limit
You can place up to 32 emitters per scene, limited to ensure compatibility with a wide range of computers, tablets, and smartphones. A counter in the emitter controls' header shows the current count, turning yellow above 24 and red at the limit:

Displaying In-range Emitters
This same Emitter section header provides a useful function whenever your listener is within range of one or more emitters - clicking on the green In-range button there will select all of those emitters, showing you their coverage overlap - very useful when setting up a Scene and deciding how far sounds should spill from their sources!
The Preset Library
Murmur ships with 18 ambient presets across four categories, ready to use with no setup:
| Category | Presets |
|---|---|
| Nature | Birdsong, Campfire, Crickets, Ocean Waves, River, Stream, Swamp, Waterfall |
| Weather | Rain, Thunderstorm, Wind |
| Dungeon | Cave Drip, Chanting, Forge, Torch |
| Urban | Crowd, Market, Tavern Music |
Many presets use a loop + stinger layering system: a continuous ambient bed (the "loop") with occasional one-shot sounds layered on top (the "stingers"). For example, the Birdsong preset plays a gentle outdoor ambience, with individual bird calls triggered at random intervals over the top of it. Cave Drip has a steady drip loop with occasional rockfall sounds. These stingers are randomised in timing and selection, so the soundscape never feels repetitive.
Each preset also comes with a sensible default DSP - Cave Drip defaults to the Cave reverb, Torch to Stone Hall, Market to Indoor Room - so they sound right straight out of the box.
Beyond the bundled library, you can use audio from the BBC Sound Effects catalogue (16,000+ sounds) or paste any URL to an audio file. See Adding URL Emitters (External Audio Sources) for details.
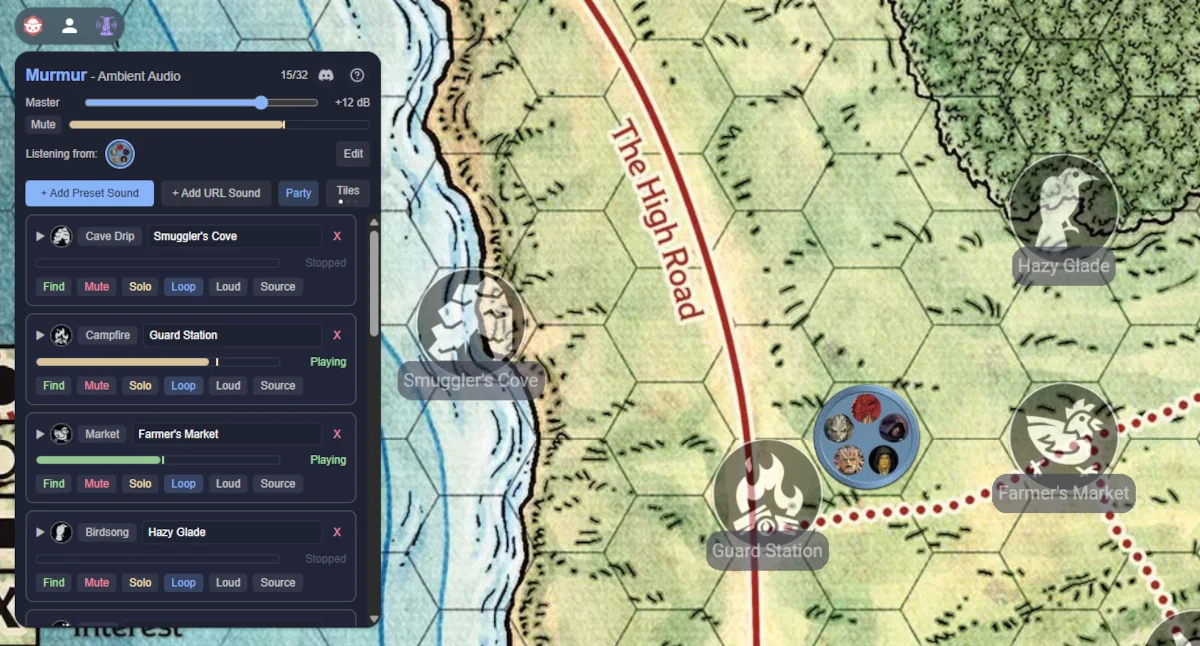
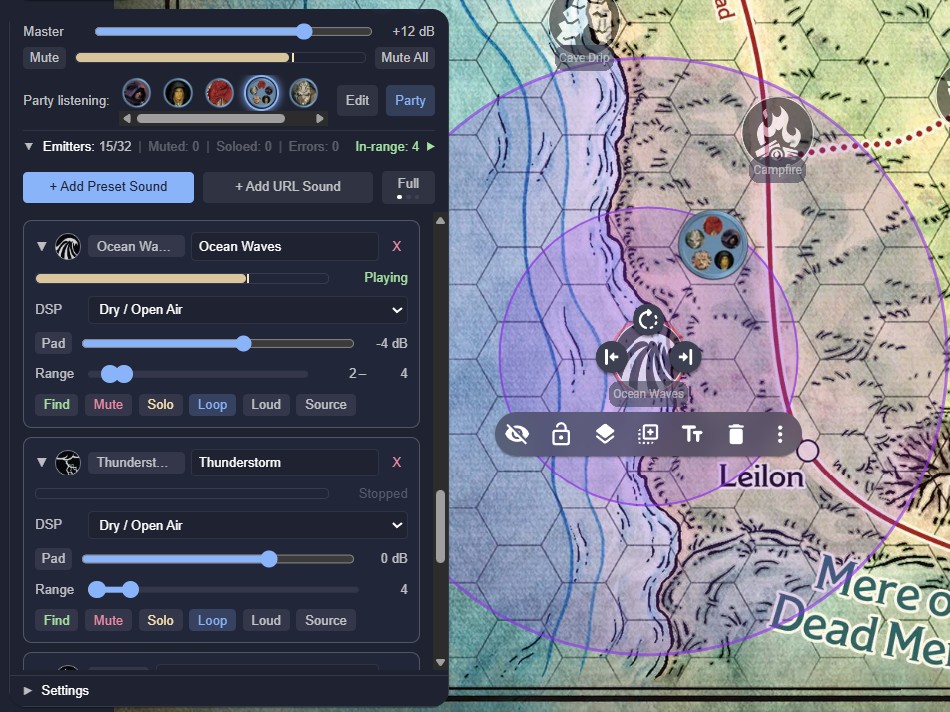
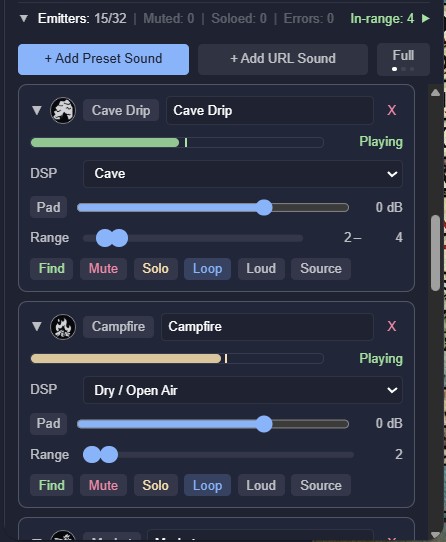
The Emitter Card
Each emitter appears as a self-contained card in the Action popover, showing its features and settings:
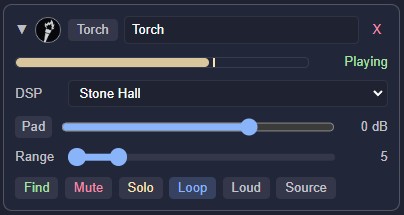
This is the default expanded view of an emitter, and from the top downwards, in each row we have:
- Collapse/expand chevron, re-ordering drag handle (icon), Emitter type, Emitter label, and Delete button (requires confirmation)
- PPM audio meter, audio status message (Loading/Error/Stopped/Playing)
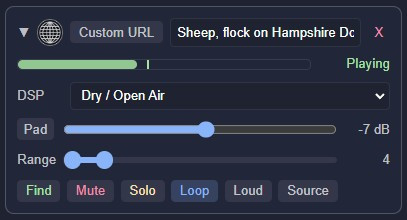
- DSP dropdown selector (see Environmental DSP for details)
- Pad attenuator for loud sources, audio level slider with numeric readout
- Range slider with start and stop distances for the volume fade-out, and their numeric readout shown in grid cells
- Find, Mute, Solo, Loop/Once, Loud, and Source buttons
Managing an emitter
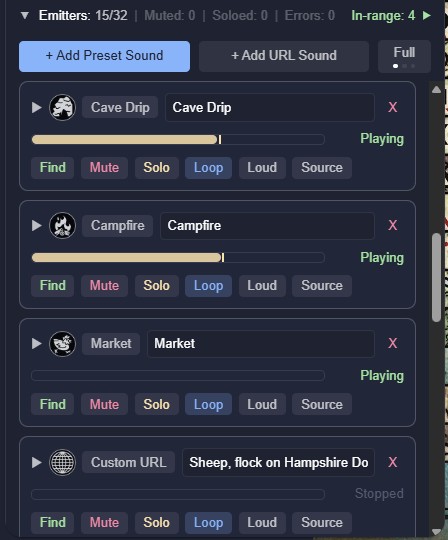
When you click an emitter card's chevron icon for its collapsed view, you see a more compact version that allows for more emitters on display at once, like this:
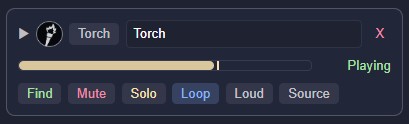
Rows 3-5 within the card are hidden, leaving you with the essential displays and controls only. Pressing the chevron again will expand the card out to its full extent.
The emitter's icon can also be used as a drag-handle for re-ordering this card in the list of emitters, which helps you to organise multiple emitters exactly as you want them.
The emitter's type is a button that expands the Audio Source page within the current card, allowing you to change the source of an emitter after you have created it, instead of having to delete it and place a new emitter of the correct type.
The emitter's label is for you to enter a specific name for this sound source - it is the same as shown in the label under the emitter's icon in the Scene, and you can alter it in either location and the other will update.
The red 'x' gives you a way to delete this emitter from the list, which is the same as selecting the emitter icon in the Scene and deleting it there. When you click this 'x' you will be asked for confirmation with a further click on either Delete or No:

Audio Source page
When you click the emitter's 'type' button in its card (found next to its icon) then you see the Audio Source page open up within the card, replacing the DSP selector, the gain controls, and the Range slider:

Initially this will show the current type and sound of this emitter, here it the Torch preset from the Dungeon group, but you can select any of the other presets from any of the other groups (Nature, Weather, and so on).
On the right-hand end of the group buttons are two external groups, which you can learn more about in Adding URL Emitters (External Audio Sources)
When you have selected the source that you want, click the Done button and the Audio Source page will close, returning you to the normal emitter controls.
Environmental DSP
This is where Murmur's audio really comes alive. Each emitter can be assigned a Digital Signal Processing preset that applies reverb and high-frequency filtering, simulating the acoustic character of different environments:
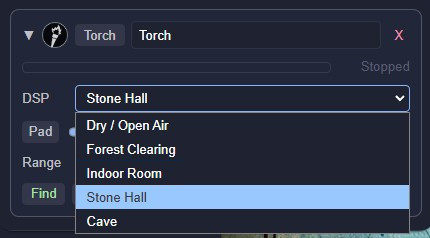
| Preset | Character | Best for |
|---|---|---|
| Dry / Open Air | No reverb, clean and present | Outdoor scenes, open fields, hilltops |
| Forest Clearing | HF roll-off, soft diffusion | Woodland, jungle, overgrown ruins |
| Indoor Room | Light reverb, natural warmth | Taverns, houses, shops, small rooms |
| Stone Hall | Medium reverb with distinct echo | Temples, castles, throne rooms, crypts |
| Cave | Heavy reverb, long tail | Caverns, mines, underground rivers |
The DSP preset selector appears on each emitter card. You can change it at any time - the transition is immediate.
Distance-Dependent Filtering
DSP presets also apply progressive high-frequency roll-off as the listener moves further from the emitter. Close up, you hear the full spectrum. At distance, high frequencies are absorbed and sounds become more 'muffled' - just as they would be in a real space. This happens automatically; there is nothing to configure.
Audio Level Controls
If you find that the bundled sound presets (or your own external audio sources) are too quiet or too loud for your table, you have a slider that provides a gain range from -28dB (decrease to 0.158%) to +12dB (increase to 1,580%), with 0dB resulting in no change:

The fixed -12dB Pad button attenuates the incoming signal to about 6% of its original level. The gain slider and the Pad button work together, so when the button is enabled and the slider is at its minimum, the incoming audio is reduced to just 0.01% - one-hundredth of one percent - of its original level!
With these level controls, each emitter can have its volume fine-tuned so that it is audible without being too loud or too quiet.
Distance & Range
Each emitter has a Range slider that defines how soon the volume starts to drop as your listener moves away from it, and at what distance the sound can no longer be heard, both measured in grid squares. A token inside the emitter's range hears the emitter at a calculated volume; a token outside the range hears nothing:

The two knobs on the slider show the start and end points of the fade-out zone. The left-hand one defaults to 0, meaning that the volume starts to drop as soon as you move any distance from the source, while the right-hand one shows where the volume drops to zero. This is the norm, so you only see the fade-out end point's value to the right of the slider.
Volume attenuates by a custom 'composite' law, as shown by the green line on the graph below. This is a concession to common misconceptions about how sound behaves, and also to cover both indoor and outdoor environments, offering a 'best of both worlds' approach:
In real life, sound reduces in volume by inverse-square law in open spaces (see the yellow line on the graph below). But, this means that small changes in distance next to the source produce large changes in volume, while the same small changes in distance further away from the source do not cause the same change in volume, and that can feel a little extreme when moving a token on screen. The common assumption is that sound will reduce in volume in a linear way as distance from the source increases, but this makes locating sounds very hard to do, as you don't get that final jump in volume as you zero-in on the source location.
So, our composite law of inverse-square and linear laws gives us the best of both worlds - a nice proximal bump in volume that helps locate the exact sound source when you're near it, and a gentler tailing-off of level as distance increases:
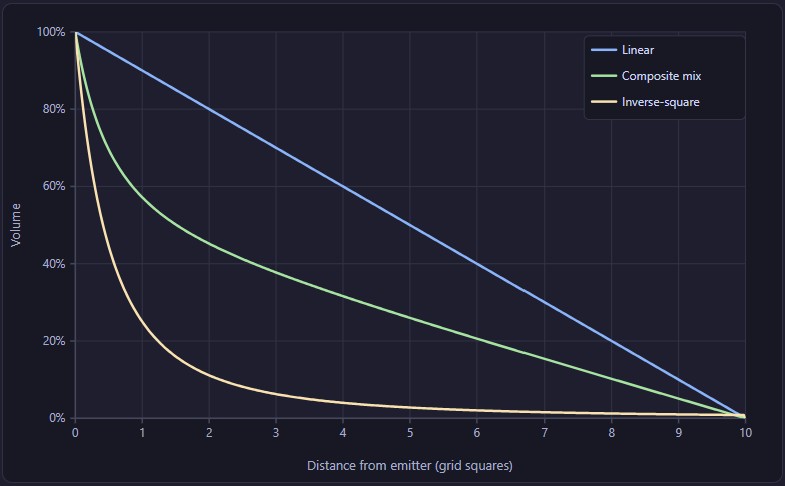
💡The green 'Composite' line on this graph shows how we keep the sharp proximal 'ramp' in the near-field to help with locating the sound, and yet have a generous audio level in the mid-field and far-field to aid with audibility (normalised for Range start and stop values of 0 and 10 grid-squares).
- Distance 0: full volume because you're right on top of the emitter
- Distance 1: nocticeably quieter even though you're adjacent to the emitter
- Distance 5: roughly the same drop in volume by halfway to the edge of the Range
- Distance 9: faint but still audible because you're near the edge of the Range
- Distance 10+: silence because you're outside the range
Range 'Plateau' Mode
As an advanced mode, you can choose to have the volume stay equally loud in a plateau zone immediately around the token, by moving the fade's start point up from 0 to 1 or more, moving it away from the centre of the sound source.

For example, a token with a Range value of 2-6 would have:
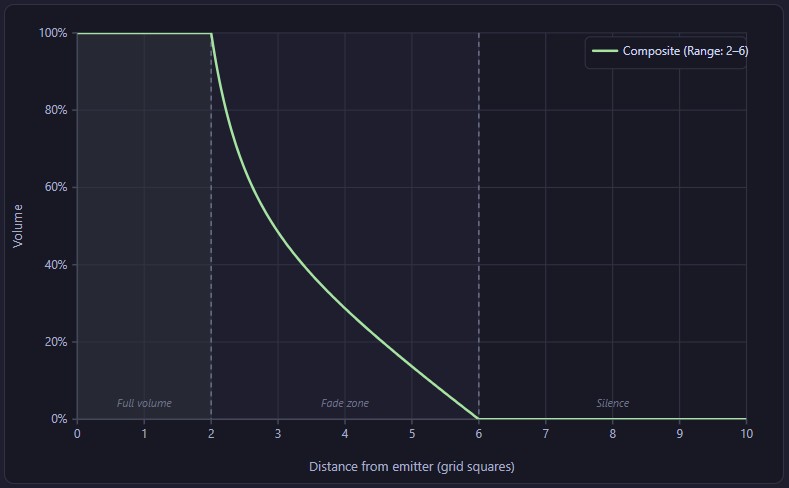
- Distance 0-2: full volume (eg. within a small, echoey stone hut)
- Distance 2-6: reducing volume (eg. outside the hut in thick woodland)
- Distance 6+: silence (eg. too far away to hear the sound)
💡This is useful for emulating a highly reverberant space where sound has nowhere to go but bounce around, while still allowing for a natural-sounding fade beyond the confines of that space. It also supports 'Theatre of the Mind' mode, where a listener token anywhere within a piece of scenery artwork on-screen can hear 100% loudness ambience (from an emitter token with a very large fade-out start value) - because fine spatial positioning is less important in TotM games
Range Rings
When you adjust an emitter's fade-out end point with its Range slider, a coloured circle appears on the map, showing the audible area:
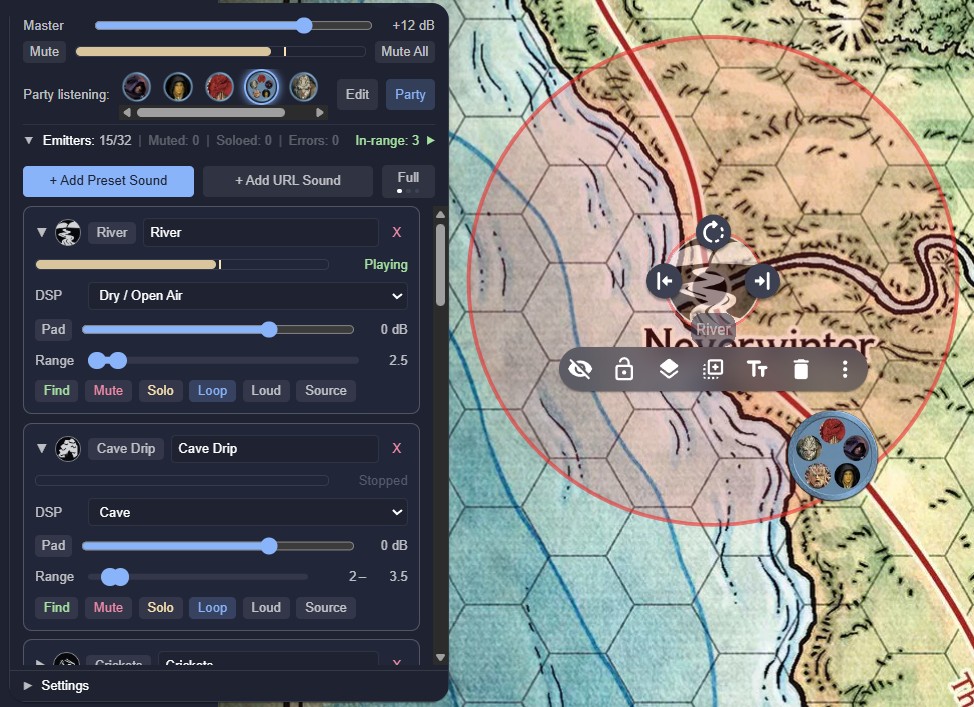
Each emitter has a distinct ring colour so you can see overlapping coverage at a glance. You can multi-select the emitter tokens in the Scene to see one or more of their ranges, which helps with identifying overlaps or gaps, and their Range sliders also take on the colour of the rings for quick recognition of the relationship between slider and circle:

Range rings are local to the GM's view - players never see them, so the players are never spoiled as to the location of the sound source.
If any of your Ranges have a fade-out distance that does not start at 0 (like the Range 2-6 example given above) then you will also see an inner ring that indicates 'full volume within this plateau range' then the normal composite fade-out curve to the outer ring, then silence beyond that:
Emitter buttons
Each emitter's card has a row of buttons at its foot:

- Find (non-destructive): centres the GM's viewport on this emitter's map position, without changing the viewport zoom level
- Mute (destructive): silences the emitter for all players. When active, the button reads Muted, the card tints red as a reminder, the other 'listening' (Solo and Source) buttons are disabled, and the card's audio meter shows no signal even when the source shows Playing:

- Solo (non-destructive): causes the GM to hear this emitter in isolation without any others, while not affecting what the players are hearing. Useful for checking or fine-tuning a single source in a complex soundscape. The card tints yellow:

- Loop / Once: toggle between continuous looping and one-shot playback
- Loud: engages a dynamic compressor that increases perceived loudness while taming peaks. Particularly useful for quiet backgrounds that have sudden loud noises, which need more presence to be fully audible without increasing the loud peaks
- Source (non-destructive): bypasses distance attenuation for the GM, so that they hear the emitter at full volume regardless of their token's position. Useful for auditioning a sound without moving your token right on top of it, and can also be used in conjunction with Solo. The card tints blue:

Reverse-Find for Emitter Cards
The Find button in each emitter's card centres your viewport on that token, but sometimes you can already see the token and instead you need to surface its emitter card quickly in the list - a kind of reverse-find function. When you right-click on an emitter token, you can see the Show Sound option in its overflow menu. Selecting that feature will cause the Action popover to open (if it was closed) and scroll to the relevant emitter card, which will pulse with a blue glow for a couple of seconds:
Changing An Emitter Token's Image
Murmur supports making its emitters visible to players (but remember to lock them to prevent accidental movement!) and even supports changing the images used for them. This means that an NPC or object token can be set up as a sound effect initially, and then have its token image swapped out (eg. using OBR's Replace Image feature) to something more meaningful in the Scene. Then when the GM moves that NPC or object around, its looped or intermittent sound goes along with it as it passes nearby the players' listener tokens!
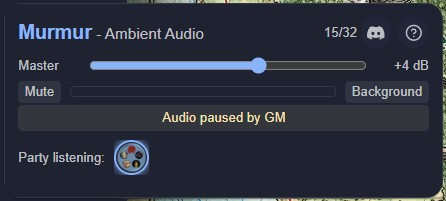
GM Master Controls

- Master volume: a global fader that affects your entire Murmur mix. Volume range is extended from -28db (0.158%) to +24dB (2,510%) to compensate for devices with low speaker volume
- Master Mute: silences Murmur for you alone
- Level meter: a PPM meter showing your combined output level
- Mute All: silences Murmur for everyone - this pauses all audio, and players cannot override it:
Persistence
All settings - master volume, per-emitter configuration, emitter positions, listeners - are saved in OBR's metadata so that they persist across page reloads and between sessions. Place your emitters once, and they are there every time you load the Scene.
The Player Experience
💡Players do not see any emitter icons in the Scene or the emitter controls in the popover. They simply hear ambient audio that changes as they move their token around the map.
When a player first opens the Murmur popover, they see:
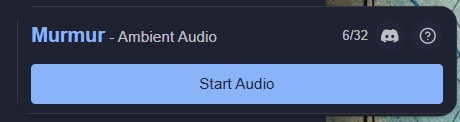
- A Start Audio button, because the browser has not yet been unlocked for audio playback
Then, when they have clicked that button to allow the audio engine to start, they see:
- Master volume: a global fader that affects their entire Murmur mix. Volume range is extended from -28db (0.158%) to +24dB (2,510%) to compensate for devices with low speaker volume
- Master Mute: silences Murmur for them alone
- Level meter: a PPM meter showing their combined output level
- Background: allows the player to stop continous loops from repeating in the background for them alone - they will hear any looped source once and it will then stop, reducing noise-fatigue for aurally-sensitive players. Button turns red when background loops are being muted:

In Player mode, if they have several listeners available then they will be able to select between them to hear different audio perspectives from those different locations:
That's all. The complexity lives on the GM's side; the player's experience is "move around the map and hear things."
Adding URL Emitters (External Audio Sources)
⚠️Emitters are invisible map markers that define where a sound comes from and how far it reaches.
Beyond the bundled presets, Murmur supports two additional audio sources when you use the +Add URL Sound button at the top of the popover:
1. BBC Sound Effects
The BBC tab in the source browser gives you access to over 16,000 sounds from the BBC Sound Effects catalogue. Type a search term - "medieval forge", "tropical birds", "busy market" - and browse results with descriptions and durations:
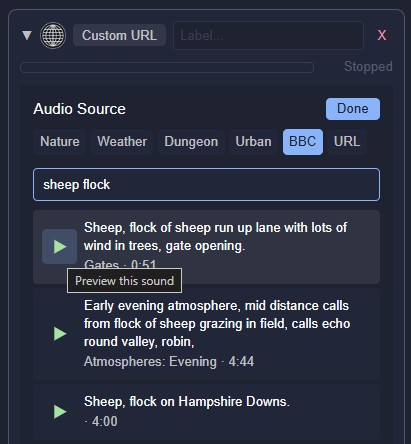
- Click the play button next to any result to preview it before committing
- Select a result to assign it as the emitter's audio source:
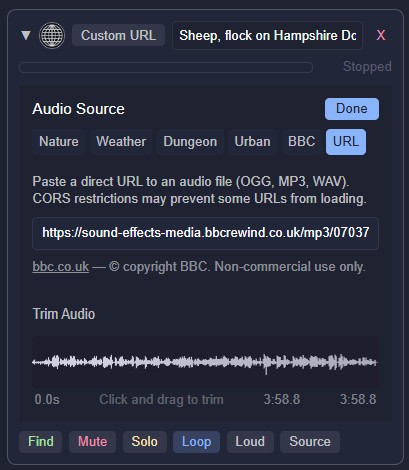
- Use the Solo, Source, and Loop/Once buttons to listen to and choose either loop or stinger playback, then click the Done button to return to the normal emitter card and set the clip's volume and Range values:
⚠️BBC audio is fetched directly from BBC servers by each player's browser - Murmur never downloads or redistributes the files. BBC catalogue metadata is used under the Open Government Licence v3.0. Audio content is linked (not hosted) under the BBC RemArc Content Licence for personal, non-commercial use. See bbc-sound-effects-licence.html for the full analysis.
2. User-Provided URLs
The URL tab lets you paste any direct link to an audio file (supported file formats are .ogg, .mp3, .wav). This works with:
- Freesound.org's preview URLs (we recommend using the CC0 filter there)
- Any CORS-accessible audio file hosted on the web
- Self-hosted audio on your own server or compatible cloud storage
CORS note: The remote server must allow cross-origin requests. If a URL fails to load, it is almost always a CORS restriction on the server side, not a Murmur issue. Freesound preview and BBC Sound Effects URLs are known to work.
Trimming & Stingers
URL emitters (both BBC and user-provided URLs) support waveform trimming - a visual editor that lets you define exactly which portion of the audio file will play.
Trim In / Out Points
Click-drag directly on the waveform display to set two draggable markers:
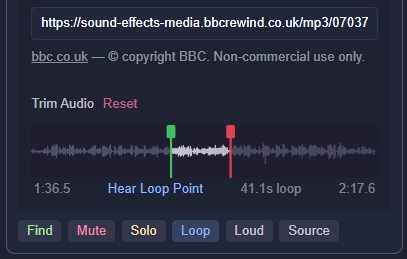
- In marker (green) - where playback begins
- Out marker (red) - where playback ends (and loops back to the In marker)
Drag the markers to isolate the best section of a longer recording. A Hear Loop Point button lets you preview the crossover to check for a smooth loop, playing from 1-second before the Out point to 1-second after the In point:
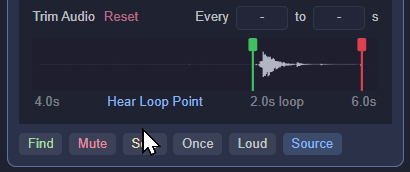
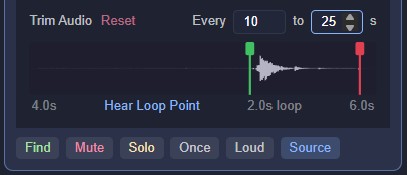
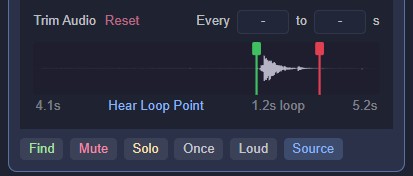
Stinger Mode
Toggle the Loop button onto its Once setting to switch an emitter to stinger mode. In this mode, the emitter plays its audio once, waits for a random duration that falls within a configurable interval, then plays again. This is ideal for randomised playback of incidental effects:
- Occasional thunder claps (eg. to accompany steady rain from another emitter in Loop mode)
- A distant wolf howl every few minutes
- A church bell tolling at long intervals
When in stinger mode, interval inputs appear on the Trim Audio row where you can set the minimum and maximum seconds between plays:
Set a zero value in both interval fields (which shows a dash - there) to disable stinger mode such that it plays just once and then stops for as long as you are in range of its emitter, ideal for one-off (non-repeating) sound effects:
Sound Zones
💡Sound Zones are a way to cover irregular shapes with ambient audio — rivers, dungeon rooms, forest clearings, or any area where a circular emitter's footprint doesn't quite fit.
Where a circular emitter places a point source with a radius, a Sound Zone uses a polygon you've already drawn on the map. Listener tokens inside the polygon hear full volume, listeners outside will hear the audio fade over a configurable Fade distance as they move away from the polygon's edge.
Creating a Sound Zone
- Draw a shape on the map using OBR's built-in drawing tools — the Polygon or freehand Brush tool for custom shapes, or any of the simple shapes made with the Rectangle, Circle, Triangle, and Hexagon tools.
⚠️It must be a 2-dimensional shape with an enclosed area, so the Marker and Line tools are excluded!
- Right-click the shape and choose Assign as Sound Zone:
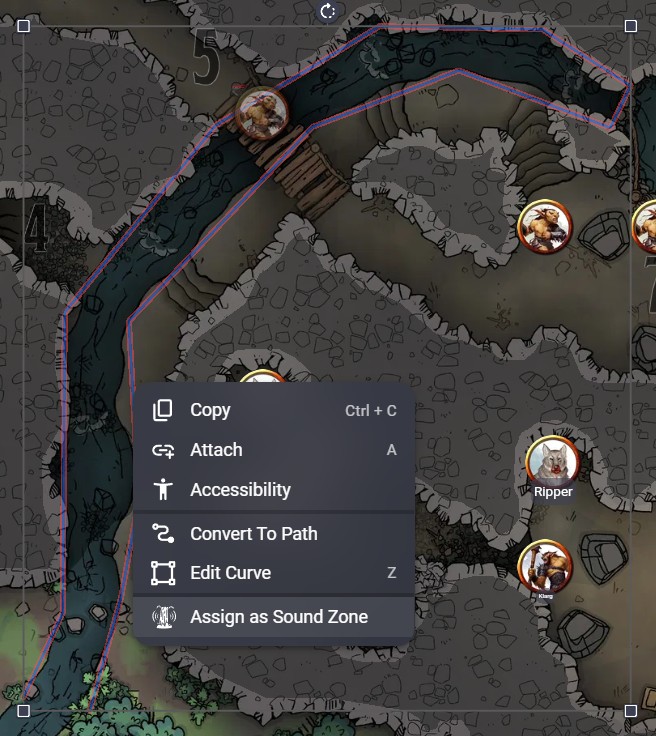
⚠️The shape stays on the map as drawn, because the polygon boundary is the full-volume area.
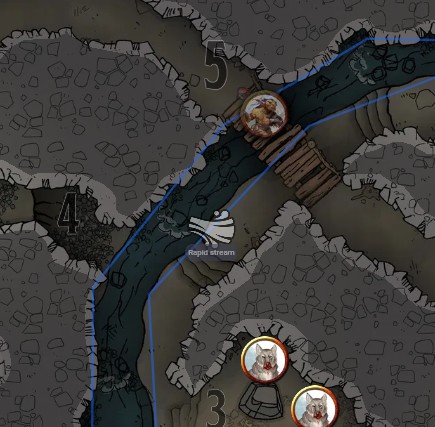
Sound Zones default to the Campfire (bundled preset) sound, but they can be edited in their emitter card to change the preset or to use an external URL. Sound Zones also get a 'cutout' variant of their emitter icon that does not have the circular surround (indicating that this is not a point-source emitter), and which has the Sound Zone's label beneath it for reference. Just like the preset sounds' icons, these Sound Zone icons are hidden from the players to prevent spoilers!

⚠️The regular 'Stream' icon is on the left, with a round surround that indicates it's a point-source that radiates sound equally in all directions. The Sound Zone 'Stream' icon is on the right, with an irregular outline that indicates it's a diffuse source that has an irregular sound coverage area
The Sound Zone icon is located either in the centre of its bounding box (if that is within the polygon) or at the the nearest polygon edge to the centre of the bounding box, but it can be moved to any convenient position without affecting the Sound Zone itself:
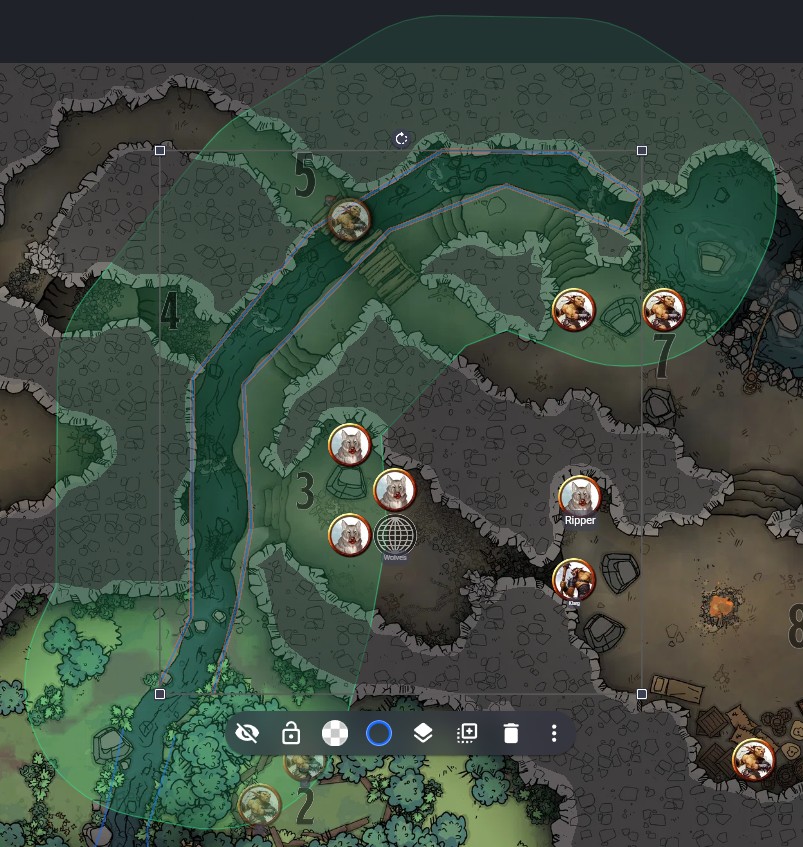
The icon also acts as a clickable 'proxy' for its Sound Zone, and when it is selected, a semi-transparent coloured border appears around the Sound Zone to show the Fade boundary (where audio falls to silence), which in this example is in 4 grid squares:
💡If you ever find a Sound Zone's icon that appears to have been separated from its proper place in the Scene, you can click on it to see where that Sound Zone is, and can then move the icon back into that area!
To remove the Sound Zone assignment (reverting the shape to a plain drawing with no audio), right-click directly on the shape - or if it's already selected you can click the shape's three-dot overflow menu button - and choose Remove Sound Zone:
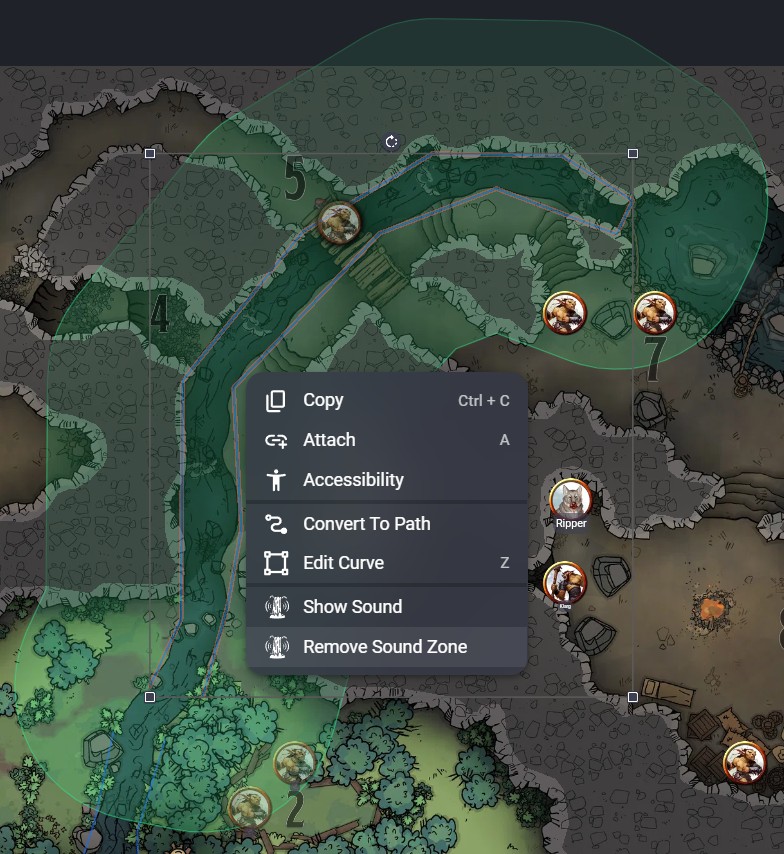
💡Removing a Sound Zone is a non-destructive operation, the object remembers your settings but disables the emitter until you use Assign as Sound Zone on it again.
The Zone Card
Assigned zones appear in the popover alongside your circular emitters and can be freely interleaved with them by drag'n'drop, and you'll see that the drag handle is not the round emitter icon, but a thumbnail of its polygon shape, which helps identify it as a Sound Zone. These cards work identically to regular emitter cards, with one difference: instead of inner and outer Range sliders, Sound Zones have a single Fade distance control, which is the distance in grid units over which audio fades from full volume to silence as a token moves outside the polygon:
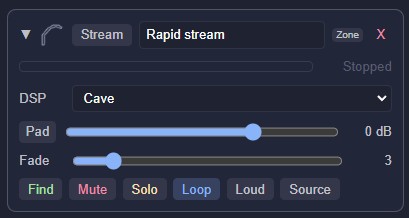
All the same controls are available, and each Sound Zone counts toward the 32-emitter limit shown in the popover header.
How Fade Distance Works
- Token inside the polygon → full volume regardless of position
- Token outside the polygon → volume fades from full to silence over the Fade distance (using our composite attenuation law)
- Token further than Fade distance beyond the nearest edge → silence
This is equivalent to the outer radius on a circular emitter. There is no inner-radius concept, because the polygon itself defines the full-volume boundary.
Notes
- Moving or reshaping the polygon while audio is playing will update the zone boundary in real time
- Any closed shape works: convex, concave, or freehand. Highly complex paths (500+ vertices) are automatically simplified to keep audio processing efficient
⚠️Self-intersecting paths (figure-eights, bowtie shapes) are rejected because one or more parts of the shape cannot have a Fade range applied due to their complex geometry - a warning will appear if you try to use Assign as Sound Zone on such a shape. If you edit an existing Sound Zone shape and it becomes self-intersecting as a result then that Sound Zone will be (non-destructively) removed, and cannot be re-instated until the shape's geometry is corrected.
View Modes
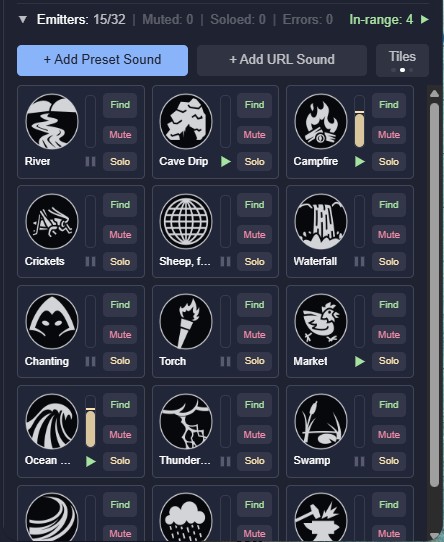
The GM's emitter list can be displayed in three main layouts. Click the Full/Tiles/Slim button next to the emitter Add buttons to switch between them:

- Full: expanded for detailed cards with all controls visible, and collapsed for button control only. Best for setting up and checking:
- Tiles - compact thumbnail grid. Good for scenes with many emitters where you want an overview and only need the Find, Mute, and Solo buttons:
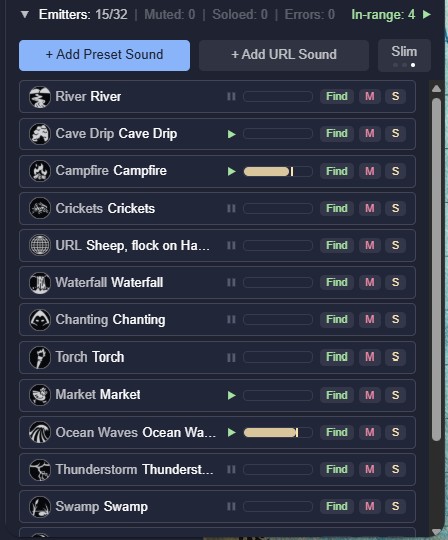
- Slim - minimal single-line rows. High density for quick vertical scanning and access to the Find, Mute, and Solo buttons:
⚠️Your view preference is remembered across sessions.
Drag'n'Drop Re-ordering
Emitters in each of the list layouts can be re-ordered simply by click-dragging their icon to move them to a new position, and all the other emitters will shuffle around to make space:

Using Murmur with Sending
Murmur is designed as a companion to Sending (voice chat for Owlbear Rodeo), though neither extension requires the other.
When both are active, Murmur's audio gain structure ensures that its ambient audio sits comfortably beneath Sending's voice conversation. At matching volume settings, Murmur's output is approximately 12dB quieter than Sending's voice channels - a natural background level that enhances the OBR Scene without competing with speech.
If you find ambient audio too quiet or too loud relative to voice chat, adjust Murmur's master volume slider.
iPhone note: When a Sending voice call is active, iPhone switches to a "play and record" audio session that is approximately 20dB (1,000%) louder than the default "ambient" session. Murmur audio will sound noticeably louder while in a Sending call, and quieter when you leave. This is an iOS system behaviour on iPhone hardware that cannot be changed without microphone access, which we aren't interested in requesting.
How It Works
Every player's browser runs its own audio engine. When the GM places an emitter, each client independently:
- Loads the audio (from bundled presets, the BBC Sound Effects library, or a user-provided URL)
- Applies DSP - reverb and high-frequency filtering based on the chosen environmental preset
- Attenuates by distance - volume falls off naturally based on how far the player's token is from the emitter
- Mixes locally - multiple emitters blend together, each with independent volume, DSP, and distance curves
Nothing is streamed from the GM's device. Nothing passes through a server. Each player's browser does the work, so there is no bandwidth cost and no latency. Audio files are cached by a Service Worker for instant replay on return visits - even the bundled library loads from cache after the first session.
Troubleshooting
"I don't hear any audio"
- Make sure you clicked Start Audio in the Murmur popover. Browsers block audio until a user interaction occurs
- Check that your token is within range of at least one emitter. Ask your GM if emitters are placed on this scene
- Check your system audio output device and volume
- On iOS, make sure your device is not on silent/mute (the physical ring/silent switch)
"Audio sounds choppy or distorted"
- This can happen on older devices when many emitters are active simultaneously. Ask the GM to reduce the number of active emitters or mute those that are far from the action
- On Android, choppy half-speed playback was a known issue with mixed sample rates - this has been resolved by standardising all bundled audio to 48kHz
"A URL emitter shows an error"
- The most common cause is a CORS restriction on the remote server. The audio file's server must allow cross-origin requests
- Make sure the URL points directly to an audio file (
.ogg,.mp3,.wav), not to a web page that contains audio - Check that the URL uses
https://, nothttp://
"Emitter icons are not visible on the map"
- Emitter icons are only visible to the GM. Players cannot see them - this is by design
- If you are the GM and cannot see them, check that you have not accidentally placed them off-screen. Use the Find button on an emitter card to centre the viewport on it
"Audio stops when I switch scenes"
- This is expected. Each scene has its own set of emitters. When you switch scenes, the previous scene's audio stops and the new scene's emitters begin playing
- Emitter configuration is saved per-scene and will be restored when you return
Support
Owlbear Rodeo's Discord is the community hub for all extensions. Join via this invite link: https://discord.gg/u5RYMkV98s and search for Murmur in the extension channels, or open a help request in #extension-help.
Privacy & Licensing
Privacy
- No personal data collection. Murmur collects no user data or personal information of any kind
- Anonymous performance metrics. Murmur gathers anonymous performance metrics (version number, engine duration, emitter count, emitter types: presets/BBC/external, DSP types, listener count, Player/Party mode) to help improve the extension. No personal information or URLs are ever collected. The GM can enable the "Metrics: no listener counts or mode data" option in their Settings page to remove the "listener count" (a proxy for the number of players) and "Player/Party mode" values from the metrics. Data are retained for up to 4 years. If you do not consent to providing any performance data then you must not use this extension
- No server communication. All audio processing happens locally in each player's browser. The only network requests are fetching audio files (bundled, BBC, or user-provided URLs)
- No microphone access. Murmur only plays audio; it never accesses or records from any input device
- Local caching only. The Service Worker caches audio files in the browser's Cache API for performance. No audio data is sent elsewhere
Audio Licensing
- Bundled presets: All bundled ambient loops are sourced from Freesound.org under CC0 (public domain). No attribution required
- BBC Sound Effects: Catalogue metadata used under Open Government Licence v3.0. Audio content linked (not hosted) under the BBC RemArc Content Licence for personal, non-commercial use. Full analysis in bbc-sound-effects-licence.html
- User-provided URLs: Users are responsible for ensuring they have the right to use any audio they link
Scene Data
Murmur stores emitter configuration (positions, volumes, source keys, DSP settings) in OBR scene metadata using the dev.murmur.* namespace. This data persists as part of your OBR room and is not transmitted to any external service.
Icon Credits
| Icon | Description | Author | Licence |
|---|---|---|---|
| Emitter type icons (18 designs) | Campfire, cave, birds, water, thunder, crowd, etc. | Lorc and Delapouite via game-icons.net | CC BY 3.0 |
All emitter icons are converted to 150x150 WebP for cross-device compatibility in Owlbear Rodeo. Original SVG sources retained in the repository.
Third-Party Libraries
| Library | Purpose | Author | Licence |
|---|---|---|---|
| Clipper2 (clipper2-ts) | Polygon offsetting for sound zone fade rings | Angus Johnson (original), Jeremy Tribby (TypeScript port) | BSL-1.0 |